
Palo Alto Site-to-Site IPsec VPN Configuration: Step-by-Step Guide (2026)
In modern networking, IPSec VPN Configuration Guide – Palo Alto connecting remote branches securely to the head office is a critical task. Site-to-Site IPsec VPN ensures that data traveling over the public internet remains encrypted and tamper-proof. This guide provides detailed steps to configure an IPSec VPN on Palo Alto Networks firewalls, including Phase 1 (IKE Gateway), Phase 2 (IPSec Tunnel), tunnel interface setup, routing, security policies, and NAT configuration. It also includes CLI commands and GUI navigation paths.
Prerequisites: IPSec VPN Configuration Guide – Palo Alto
- Reachability between public IPs of both peers – Ensure the public-facing interfaces of both peers can ping each other.
- Matching IKE and IPSec proposals on both sides – IKE and IPsec crypto profiles must match exactly on both firewalls.
- NTP configured for time synchronization – NTP must be configured on both sides to avoid certificate or timing mismatches.
Phase 1: Configure IKE Gateway
GUI Path: Network > Network Profiles > IKE Gateways
- Click Add and provide a meaningful name.
- Select the interface assigned with the Public IP and specify the Peer IP address. Specify Peer IP address.
- Authentication: Choose Pre-shared Key or Certificate.
- IKE Version: While both versions are available, IKEv2 is the best practice. IKEv2 is more reliable, supports NAT-T natively, and is significantly faster than IKEv1.
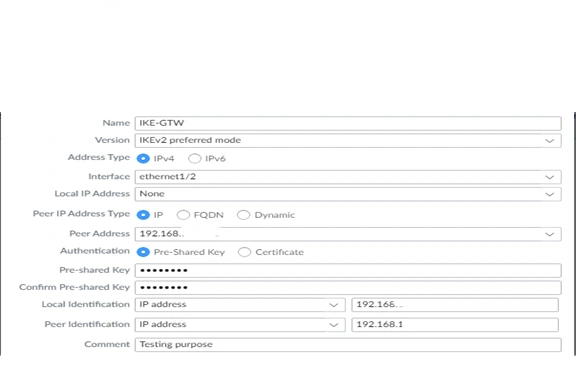
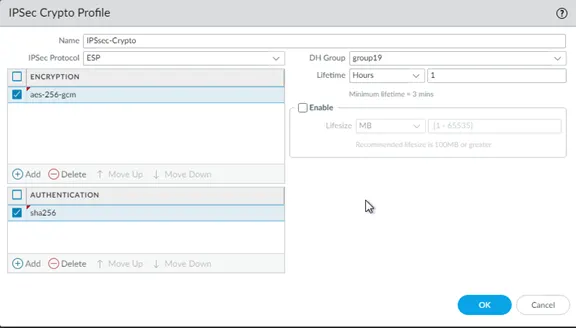
IKE Crypto Profile: Configure IKE Crypto Profile (Encryption, Authentication, DH Group, Lifetime). Define your encryption (AES-256), authentication (SHA-256), and DH Group (Group 14 or 20 for better security). IPSec VPN Configuration Guide – Palo Alto

CLI Commands: IPSec VPN Configuration Guide – Palo Alto
set network ike-gateway <name> peer-address <IP>

> set network ike-gateway <name> authentication pre-shared-key <key>

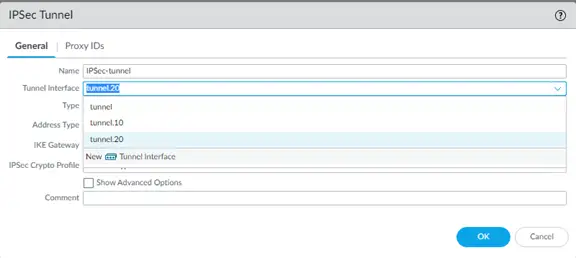
Phase 2: Configure IPSec Tunnel
GUI Path: Network > IPSec Tunnels
- Click Add to create a new IPSec Tunnel.
- Select the IKE Gateway created in Phase 1.
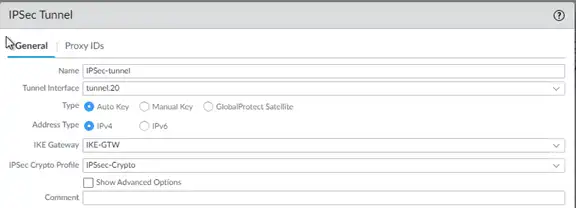
Assign IPSec Crypto Profile (Encryption, Authentication, Lifetime). > IPSec Crypto Profile > under drop down select new and create.
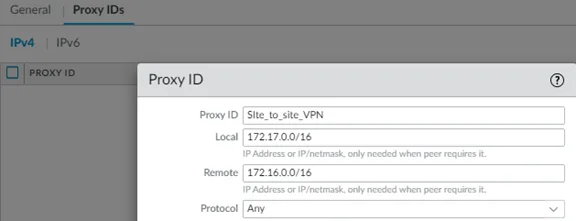
Configure Proxy IDs (Local and Remote subnets).
CLI Commands: IPSec VPN Configuration Guide – Palo Alto
> set network ipsec-tunnel <name> ike-gateway <gateway-name>
> set network ipsec-tunnel <name> proxy-id local <subnet> remote <subnet>
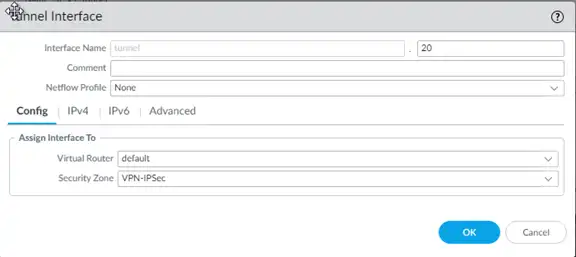
Tunnel Interface Setup: IPSec VPN Configuration Guide – Palo Alto
- Create a tunnel interface under Network > Interfaces > Tunnel.
- Assign it to a Virtual Router and Security Zone.
Bind the tunnel interface to the IPSec Tunnel configuration.
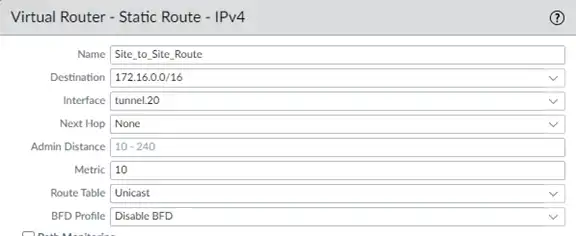
Routing Configuration: IPSec VPN Configuration Guide – Palo Alto
Add static routes for remote subnets pointing to the tunnel interface under Network > Virtual Routers > Static Routes. The destination should be your remote subnet, and the interface should be the Tunnel interface you just created.
Security Policies: IPSec VPN Configuration Guide – Palo Alto
Create policies to allow traffic between VPN zone and internal zone under Policies > Security. Ensure you are using Exact requirements in Address, URLs, Application service avoid to go with any as Security Engineer

NAT Configuration: IPSec VPN Configuration Guide – Palo Alto
Ensure No-NAT rule for VPN traffic under Policies > NAT. IPSec VPN Configuration Guide – Palo Alto
Advanced Troubleshooting & Verification: During this lab, a common issue occurs where the tunnel shows “Up” (Green), but traffic does not flow.
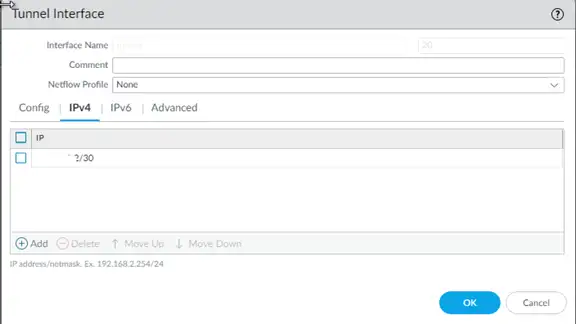
Scenario Analysis: In IPSec VPN Configuration Guide – Palo Alto I faced an issue where the tunnel was active, but communication failed. After analyzing the logs, I realized the Tunnel Interface was missing an IP address, and the next-hop IP was missing in the static route configuration. Correcting these two points immediately restores connectivity.
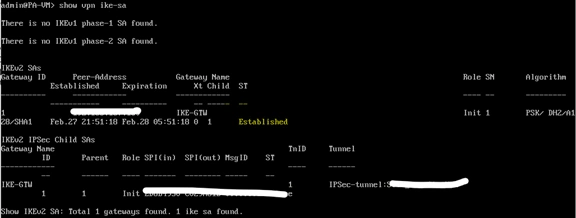
Verification Commands:
> show vpn ike-sa
> show vpn ipsec-sa

> show log system subtype equal vpn

Finally, Communication Started successfully.


Best Practices:
- Match proposals and Proxy IDs on both peers.
- Enable Dead Peer Detection (DPD).
- Use strong encryption (AES-256) and authentication (SHA-256).
- Regularly monitor VPN logs and tunnel status.
Conclusion
- By following these steps, you can successfully deploy a secure Palo Alto Site-to-Site VPN. Always remember to match your proposals and enable Dead Peer Detection (DPD) for better stability. In our next lab, we will explore advanced Global Protect VPN configurations.
Follow My Guide for Aruba Controller Upgrade Process in detailed 2026
Checkout my blog
